Thursday, April 12, 2012

Engine Follies

When I bought this car, I had no idea if the engine was any good.

The engine prior to tear down
It looked ok, and when I gave it a test--turning it over with a wrench--it was not frozen, which I took as a good sign.  Another good sign was the absence of oil, either on the bottom of the engine, or from any the various places where leaks typically develop, like the oil pump and front seal.  I made the decision early on not to buy a rebuilt engine for the Ghia, or to even rebuild the engine in it, for a couple of reasons.

First of all, replacing the engine with a 'brand new' completely rebuilt one would cost me around $2K.  While this would eliminate any question of how the Ghia will run, it is also too expensive to consider as a reasonable option.  After all, I only paid $1,300 for the car itself!

The clutch came off first
Nor did I want to  rebuild the engine, as this is a most difficult and time consuming task.  It's not without it's rewards, which I know because I have rebuilt a VW engine once before.  It took me several months and even though I was successful (perhaps because) I didn't want to tackle this job unless I absolutely had to.

Besides, while it doesn't cost nearly as much, rebuilding an engine can be a fairly expensive task if a lot of parts need to be replaced.  So, not eager to perform the work, and not knowing how much it would cost, I elected to forgo the whole thing and simply put the old engine back into the new car.  I figured that if it didn't work, it's a relatively simple matter to remove the engine and replace it if I absolutely have to do it.

The clutch plate and disc
Of course, I did not plan on simply bolting the old engine onto the transmission without cleaning it up a bit, so as soon as I finished with cleaning up the heads, I turned to the engine to see what I could do to make it look and work better without actually cracking it open.

Clutch disc looks good
The first thing to come off was the clutch.  Looking at the clutch plate from the outside, the absence of dirt and grime suggested to me that the clutch disc inside was going to be in pretty good shape, and fortunately, this proved to be the case.  In fact, I was encouraged because the lack of wear on the disc suggested that it was a replacement, and that the car had not been driven a great deal.  This in turn made me think that then engine was likely to be in pretty good shape.

New cylinders and pistons
These cylinders are shot
The cylinders, however, told another story.  Although they did not appear to be leaking gases at either the base or the heads, these unpainted and untreated steel pieces were covered with rust.  On a VW engine, the cylinders are designed to be easily replaceable and they are relatively inexpensive, so I decided to do just that.  A replacement set of cylinders with pistons and and wrist pins was just under $100.

The case gets cleaned up...
...and painted
The engine case was in need of a good cleaning, so after removing the cylinders, I spent a few hours going over it with a wire brush and some solvent.  Then I masked off the cylinder ports and gave the case a quick coat of black paint.

Pistons and wrist pins are first
The wrinkle band ring compressor
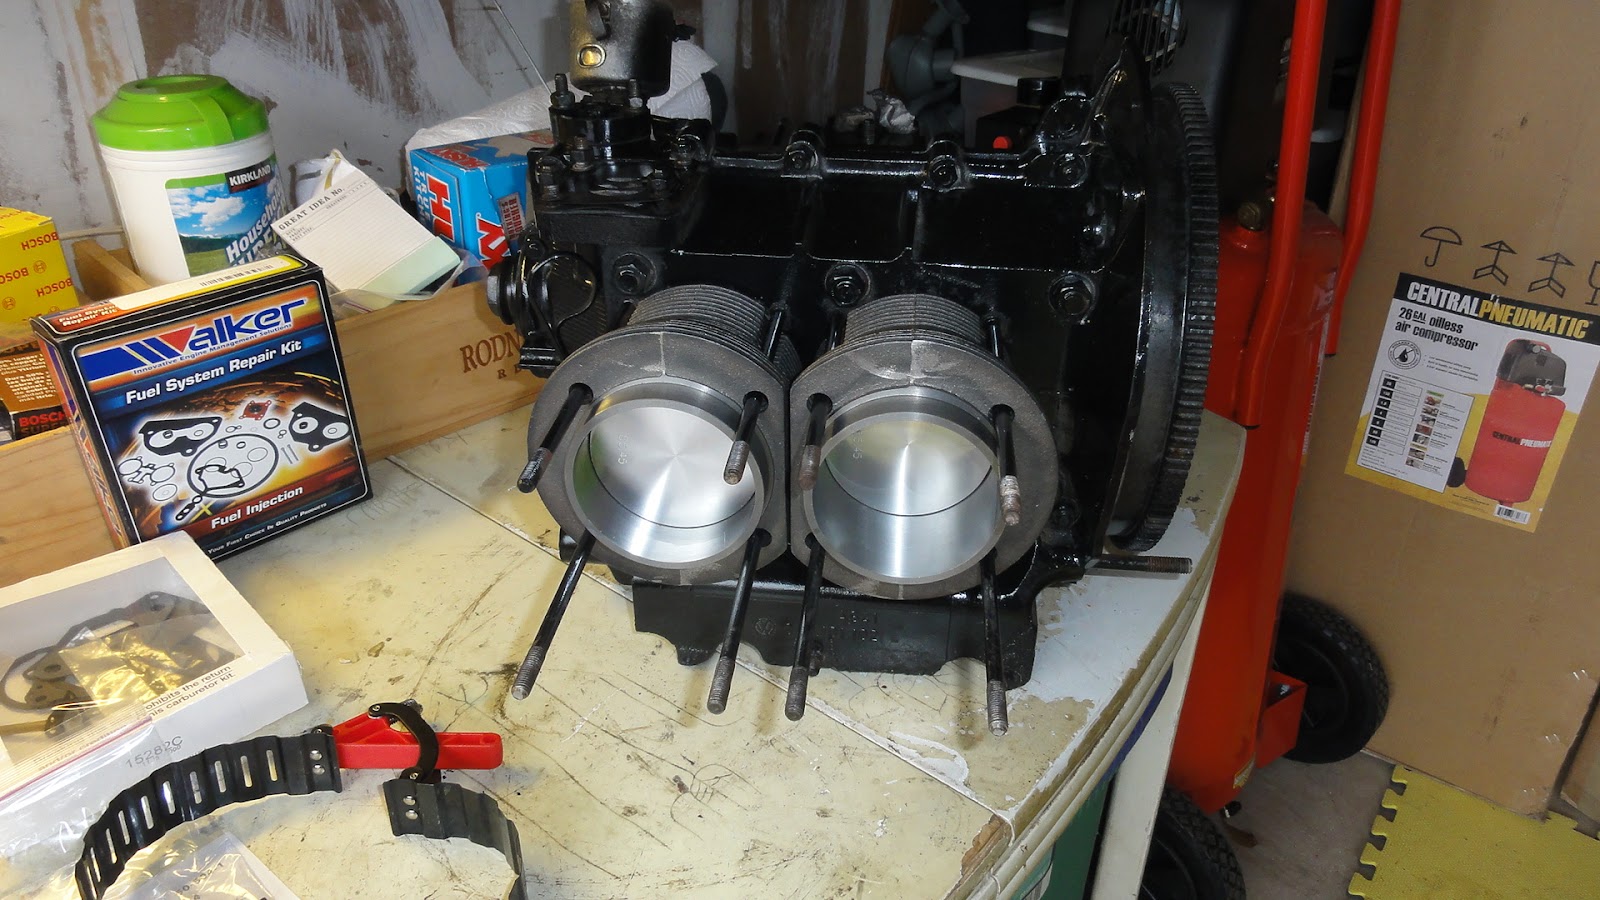
Next it was time to mount the new cylinders and pistons.  This required the use of two special tools, one of which I had to order.  I already have a set of locking ring pliers, but needed a wrinkle band ring compressor to slide the pistons into the cylinders.

Compressor in action
It worked perfectly
Auto parts stores do not sell this tool so I had to order it online.  With the pistons mounted on the connecting rods, I used the ring compressor and mounted all four cylinders.  It was starting to look good.  With a few more pieces, like the heads, pushrods and tubes, it would really start to look like an engine.

Ready for the heads
Both cylinders are on
I finished mounting all the cylinders and stepped back to admire my work.  I spun the clean and painted case around on the table a couple of times and decided to call it a day.  But before leaving, I somehow got the idea to check the fuel pump.  I'd taken the pump itself off the block a long time ago, leaving the plastic fuel pump pushrod guide in place to keep stuff from falling into the engine through the open hole.  Now that I had the beginnings of an engine block, the guide had done it's job, so I figured I'd pull it out to have a look at it.

Fuel pump guide, obviously broken
Disaster
I could not have been more disappointed when I pulled it out.  Instead of a whole guide, what I removed was broken, missing a fairly large piece at the bottom.  Whether it broke as I removed it (unlikely) or had been broken the whole time, I will never know.  But it doesn't matter.  I knew even as I saw the broken piece that there was only one outcome.  I would have to take the engine case apart, find the debris and rebuild it from the crankshaft up.

That piece?  In here...
Now, this is not the end of the world.  It's not even all that agonizing, since I still believe that with the new pistons and cylinders, this engine will run perfectly.  By tearing it down, I'll have an opportunity to be certain about the capability of this engine.  If the bearings (or anything else inside) are shot, well, then I'll know it's time to buy a new engine.

However, this is going to delay the completion of the project by a few weeks, to say the least.

Next:  What's inside.

Wednesday, March 14, 2012

New Tools, Clean Heads

Well, I went out an bought some new toys...erm new tools for my project and workshop.  I've been thinking for some time about a few tools that I need to add to my workshop in order to tackle the upcoming jobs related to the body.

New air compressor...too small
The first thing on my list was a new air compressor.  I've got a pretty comprehensive set of hand tools, but I really don't have any power to do more difficult jobs like sandblasting, cutting, grinding and sanding.  I've got some good electric tools too, including an angle grinder/cutter and a die grinder for the bigger wire wheel jobs.  I have a bench grinder/wheel and a shop vac, but other than those basics, it's not much.

New air compressor...right size
Nor do I want much more, but I do want to take advantage of air power for the rest of this rebuild, so when I had a few hundred dollars saved up, I bought an air compressor.  of course, the first one I bought was too small, so I went back a couple of days later and traded up for a larger model.  It actually has the same motor and pump, but the tank is bigger, which allows for a longer use of a tool at any one time.  Since some of the jobs are fairly long, I need all the tank I can afford.  For now, this will do, but if I had in mind painting the car (which I don't) then I'd need the next size up at least.  As it stands, this compressor and tank is quite adequate for my immediate needs.

Sandblasting gun and abrasives
My blasting 'booth'
One of those needs is sandblasting, so one of the first tools I bought to go with my new compressor was a sandblasting gun.

It looks like a paint gun and operates the same way, essentially.  You fill the container with abrasive, attach it to the air compressor hose and blast away.

I look like an insurgent
Blasting away
Actually, it's not as simple as that.  I bought a bag of sand from Home Depot on my way back from buying the compressor and blaster, only to discover when reading the directions that "Sand may not be used as a blast material."  It turns out that a special abrasive is required.  Fortunately they sell this at Harbor Freight, where I bought the compressor and blast gun.  It is expensive, but it is worth it, I think.

It's not powerful but it works
The worth is in the ease and amount of time it took to blast my first few items.  Once I got it set up and covered myself adequately (I discovered that the blasting is equally back at the operator--a matter of physics) it turned out to be quite easy to use and not as powerful as I thought it was going to be. This is actually a good thing, because I was afraid it would simply blast away all the metal if I pointed it at one area for too long.  While this may be the case with more powerful units and certainly there is some degradation when it's directed at a single spot for too long, but it's hardly even powerful enough to take the skin off my finger.  I know because I tried.  Not deliberately of course, but I do know just how powerful this tool really is, and that's not much.  It is just powerful enough to take off paint, some surface rust and aluminum oxidization, which is really about all I need.

Rusty handbrake lever...
Transformed...nearly.
The first thing I blasted was the handbrake lever I recovered from the junkyard a week or so ago.  The blaster took off all the paint and some of the surface rust without even scratching the steel at all.

Aluminum cleans up nicely
The manifold is nearly done
My next test was on the manifold, which is made of aluminum and steel.  The blaster cleaned up the aluminum without degrading it, and took all the built up grease and grime off the steel tube with no problem.  I do have to stop every ten minutes or so to allow the compressor to recharge the tank, but this is a minor inconvenience.  I'm actually glad to stop after a few minutes because the abrasive really gets in everything in spite of goggles, a face mask, a hat and a long sleeved shirt buttoned up at the collar and sleeves.

These fins are hard to clean
The carbon buildup in the heads
The last thing I did with blaster was to clean off the heads.  I had cleaned them up about 90% of the way, but had no way of cleaning in between the fins and in all the crevices, not did I want to scratch the inside of the heads where the carbon buildup was the most extreme.

All clean after a blast
Put away till it's time for them
Enter the blaster.  This did both jobs, and in just a few minutes I had a clean set of heads, ready to install on the engine.  I put them away in a box as I start the next task of tearing down and rebuilding the engine.

My little shop
Not big but effective
Oh, and I treated myself to another toy.  Not a tool exactly but in the same category.  I bought a new tool chest.  This one is more than just a tool box.  It's an actual five drawer chest with deep drawers and rollers.  With my little old red box on top, I now have a place to store most of my tools, including all the new air toys..erm, tools.

Thursday, March 8, 2012

The Phillip Way or Rear Disc Rebuild

Well, there are always two ways to do a job.  The right way and the Phillip Way.  And since these are two opposite ways of doing things, you may assume, Dear Reader, that the Phillip Way is indeed the wrong way.

So it is and so it has been for many years.  This applies to many things around the house, like plumbing and electricity and screen door and toilet float installations, and it has not changed now that I am working on something as different or substantial as the Ghia.

Built the Phillip Way..wrong!
For example, one or the other of you sharp-eyed Readers will have noticed that I have already installed the new disc brake kit on the rear, complete with spacers, o-rings, gaskets, brackets, bearing caps and lots of grease.

Well, not exactly complete.

In fact, in keeping with Phillip's Way, I left a couple of things out the first time around.  No, this was not an accident, but in keeping with the instructions. Honest!  I know, I know, I am not supposed to read those things, but after putting it together, the brake calipers just didn't fit correctly around the rotors.  They weren't centered in the gap so I had to see if I had done something wrong.

All the parts laid out...
Packed with grease
Of course, I had done something wrong, but as it happens, what I did was actually according to the instructions.

Now, how, you ask, is that possible?  Well, what if the instructions are wrong?  Why they would be wrong is a mystery to me, but I can say with some certainty that putting the disc brake kit together excatly as prescribed in the instructions does not result in the the proper fit.

Big o-ring and paper gasket
Next is the thin 'thrust washer'
It has to do with two parts, a thin spacer or shim, and an o-ring.  Both parts, according to the instructions--are to be omitted from my particular type of transmission and driveaxle assembly.  Known as IRS (Independent Rear Suspension), the type of drivetrain in my 1974 Ghia is different than the kind that came before it, the trans-axle, or 'Swing-Axle' as it is sometimes called.

Followed by the small o-ring...
...the bearing cap goes on.
Without getting into the differences between the two drivetrains, it's worth noting that they are completely different in the way they go together, but the function is similar enough that most of the parts are interchangeable.

Most of the parts.  Not all the parts.

With the rotor on the axle...
...the caliper can go on.
The bottom line is that, after days of experiments, I finally come to the conclusion that the two parts that were supposed to be omitted according to the instructions were actually supposed to go on after all.

So, I started over and rebuilt both sides, this time with all the parts.

First I gathered everything together.  Next step, I loaded the bearing with grease, put on the paper gasket and the large o-ring.  Next I put on the thin thrust washer (shim) and on top of that went the small o-ring.  The bearing cap, with the large spacer inserted into it in advance, slid onto the axle and covered up the whole set of pieces.

The rotor is now centered in the gap.
Once it was bolted down, I installed the caliper (again) and this time, voila!  It all lined up perfectly.  I do not know why the instructions were wrong.  I discovered the solution only by trial an error because the 'solutions' I found on the net were either wrong or incomplete at best.

I am not absolutely sure this is right, but it sure looks right and it even makes some sense.  Of course, that's not the Phillip Way, but it will get my Ghia built correctly!

Friday, February 17, 2012

Rear Disc Brakes

It's beginning to feel like I am on a see-saw.  Front to back and back to front we go.

One half of the new set of disc brakes
A shiny new caliper
With the front brakes done, it was time to move on to the back.

Originally, the Ghia had stock drum brakes in the rear.  When I pulled these off the car I resolved to upgrade to a set of new discs.  The bolt-on kit cost just under $350, but it is really worth it.  Not only did this save me from having to clean up all the old rear drum brake parts, but it meant that I get to bolt in a whole set of shiny brand-new parts.

Trailing arm bearing is ready
A new seal for the bearing cap
After pulling it apart and cleaning it up again, I began the rebuild by replacing the oil seal in the original bearing cover.  Next I brought out all the pieces for one side and laid them out next to the car.  Then came assembly.

Parts ready, set, go!
Bracket installed...incorrectly
Sadly, the documentation for brand-new these parts is like something out of the seventies.  The instruction sheet is photocopied and it looks like it's been through a few thousand versions.  Also, it isn't clear from the instructions which parts actually need to go on.

The new rotor slides right on
Time to add the caliper
That is, in addition to providing all those shiny new bits, they actually provide some parts that don't go onto my car.  This meant that figuring out which parts to leave out was almost as hard as figuring out which ones go in.

Eventually I managed to figure it out and assemble the new caliper mounting bracket in the bearing set, but being me, I did it wrong the first time.  Fortunately I am a bit of a nut about taking pictures so all I ahd to go was go back to the day I took it apart and look at the picture to figure the correct configuration.

Left side brake installed
Even after fixing my rookie blunders, it didn't feel like the new calipers were fitting correctly.  The thing is, the distance between the new caliper bracket and the rotor is so small that it makes me nervous.  Even a small bit out of whack and the whole thing will tear itself up inside.

Although they are installed, I am not satisfied with the way they work.  I've been reading about others' problems with the kit and think I know what to do, but that will have to wait.

Monday, January 30, 2012

Front Brakes

The caliper needs to be rebuilt
Parts cleaned and painted
With the driveaxles in and the back of the car now looking very spiffy, it was time to turn my attention back to the front and to the assembly of the front brakes.

I started by rebuilding the brake calipers.  After taking them apart I discovered that the seals were shot, so I ordered a rebuild kit that came with new seals and the snap rings to hold them in.

These front discs are shot
It's all back together
Of course, when I read the directions for the rebuild kit, the first thing it said was "Do not disassemble the two  halves of the caliper."  Hmmm...too late.  I cleaned, buffed and painted the two halves, then put in the new seals, snap rings and bolted them back together.

Backing plates need to be cleaned
New, freshly turned rotors
Next came  the backing plates.  These had to be cleaned, primed and painted before any assembly could commence.  I also painted parts of the new rotors I purchased some months back.  The old rotors were far too pitted and grooved to function properly, so I bought a used set and had them turned on a lathe at Austin VeeDub for $50 apiece.

The new bearing is on
Time to mount the rotor
Once the backing plates were dry and in place, it was time to mount the rotors.  I bought new bearings, so after packing the interior of the rotor with fresh grease, I put in the new bearing sets and slid the whole thing onto the spindle.

Amazingly, it went on without a hitch and it even spins freely.
It works!
Next came the rebuilt calipers.  These, like the rotors, are heavy pieces of steel, so once these parts get put back on the car, it really begins to weigh it down.  It's also beginning to look like a car again!
As is my habit, I somehow managed to put the calipers on the wrong sides at first, and in response to the scraping sounds that it caused, I took them off and switched them around.  Voila!

  It was a perfect fit with no scraping at all.  I also got new brake hoses and brake lines, but these, along with the new master cylinder, will have to wait to go in another day.